



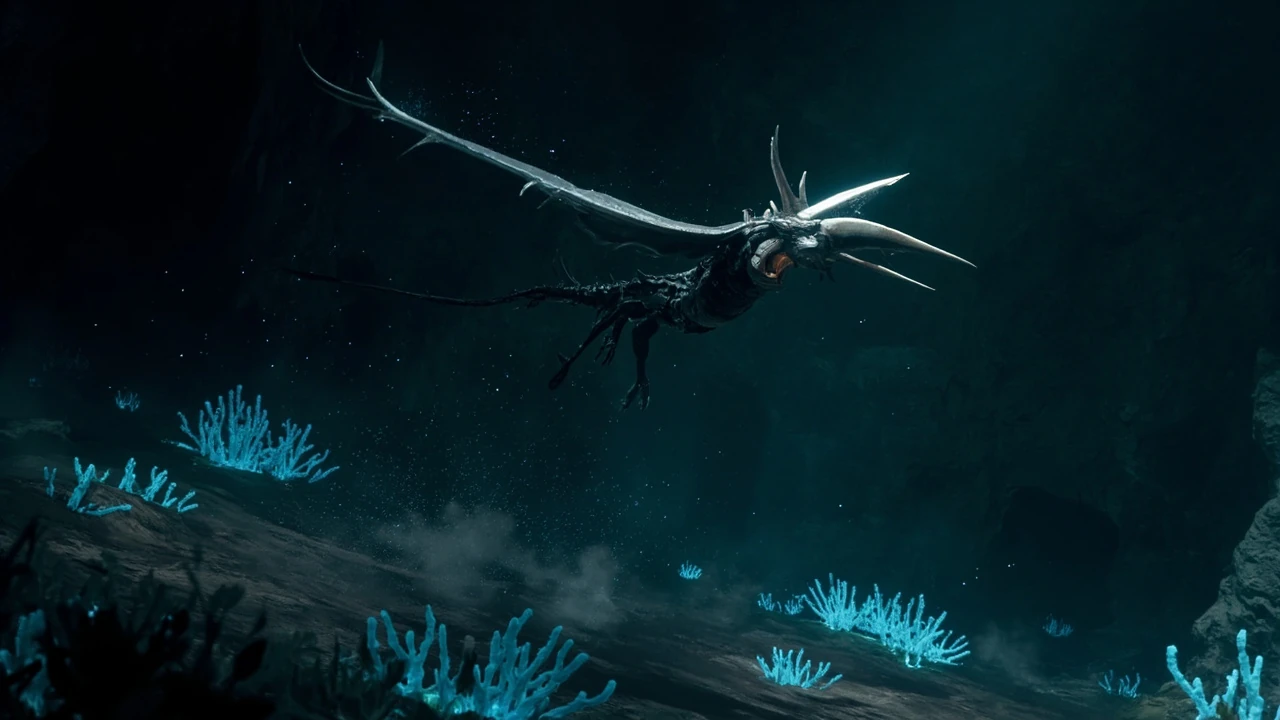

Moorwing Silksong: how the enemy is designed and how to fight it
The Moorwing is one of the airborne threats that players will recognise quickly in Hollow Knight: Silksong, because it telegraphs almost nothing and punishes the same mistake twice. A small, darting creature with a long beak, it lives in the vertical shafts of a decaying kingdom and behaves like a winged ambush predator rather than a standard flyer. The reason players keep asking about moorwing silksong encounters is simple: the enemy is fast, irregular, and designed to feel different from the grounded bugs that dominate most of the early areas.
This guide treats the encounter the way a developer would. First it explains how the enemy is constructed: its silhouette, movement logic, and the role it plays inside the game’s combat and exploration systems. Then it walks through the fight in a way that respects the game’s difficulty philosophy, with notes on how the encounter is balanced, how it teaches itself to the player, and what the design reveals about Team Cherry’s wider approach in Silksong. The aim is to give both a working combat plan and a clear read on the design choices behind the enemy.
What the Moorwing actually is in the game world
Inside the setting of Hollow Knight: Silksong, the Moorwing is a flying predator that haunts the higher reaches of certain cavern and ruin biomes. It is not a unique boss, but it is also not a generic pest. Team Cherry typically designs the standard enemies of the series with a strong silhouette and a single defining behaviour, so the player can read the encounter from a distance and decide whether to engage, avoid, or use a specific tool.
The Moorwing’s defining features are easy to list:
- A slender body with a long, sharp beak that doubles as the primary attack hitbox.
- Translucent or feathered wings that beat rapidly and produce a soft whoosh cue.
- A tendency to hang from ceilings or walls before launching itself at passing prey.
- Limited ground presence, which forces the fight to take place in the air or along vertical surfaces.
For developers, that silhouette matters more than the visual detail. The long beak tells the player where the damage arc is, the wings tell the player when an attack is about to come, and the wall-hanging behaviour tells the player that this is a vertical threat rather than a corridor enemy. Each of those is a separate design decision, and they all reinforce the same idea: the Moorwing is a precision dive enemy, not a flier that can be swatted with vertical pogo bounces indefinitely.
How the Moorwing’s behaviour is built
Enemies in Hollow Knight and its sequel tend to be built as small state machines, not as complex AI scripts. A creature has an idle state, one or more patrol states, an alert state, an attack state, and a recovery state, and the transitions between them are triggered by simple conditions such as distance, line of sight, or a damage threshold. The Moorwing fits that model, and you can read its behaviour as a chain of predictable transitions once you know what to watch for.
When the player enters the right radius, the creature lifts from the wall, beats its wings once or twice, and then tucks into a dive. The dive is its main attack and the reason it is dangerous. The wings spread again at the end of the dive, which doubles as a brake and a setup for a follow-up turn or a second pass. After two or three dives, the Moorwing retreats to a wall and re-enters its hanging state, which gives the player a short window to counterattack.
| State | Trigger | Visual cue | Player opportunity |
|---|---|---|---|
| Hanging | Player outside attack radius | Body pressed to wall, wings folded | Free to pass, heal, or plan a jump |
| Wing-up | Player enters radius | Wings spread, body lifts, short hover | Very short, used to read the dive direction |
| Dive | Wing-up completes | Beak leads, wings tuck, body forms a line | Move laterally, dash, or pogo above |
| Brake and turn | End of dive | Wings flare, body curves upward | Hit the body with a downward strike or skip past |
| Retreat | After fixed number of passes | Wings slow, creature drifts to a wall | Counterattack window and repositioning time |
The pattern above is not just useful for the player. It is also useful for understanding why the enemy is paced the way it is. The state machine gives Team Cherry a simple way to tune difficulty: shorten or lengthen the brake state, change the number of passes before retreat, or alter the dive angle. Because the visual language for each state is consistent, players can learn the enemy in one life and then apply that reading to every other Moorwing they meet in the same run.
Why the Moorwing works as a Silksong enemy
Enemies in the Hollow Knight series do more than block the path. They teach the player a specific skill, and they are usually clustered in areas that test the same skill with a different rhythm. The Moorwing is built to teach the player how to fight in open vertical space without a floor underneath them, which is one of the more demanding micro-skills in the game.
Three design choices make that lesson stick:
- Verticality: the dive attack only works if there is space under and beside the player, so the fight trains lateral movement and aerial positioning.
- Short telegraph: the wing-up is intentionally brief, which forces the player to commit to a defensive action rather than to a perfect reaction every time.
- Clear recovery: the retreat state is long enough to reward a hit, which keeps the encounter from feeling cheap even when the player is learning.
Those three choices are the same trade-offs developers make whenever they build an enemy that needs to feel fair without feeling generous. A longer telegraph would make the fight trivial. A shorter recovery would make the fight feel punishing. The current balance, at least as the encounter is generally described in community discussion of the game, sits in the middle and is one reason the Moorwing is memorable rather than irritating.
Reading the encounter before you start the fight
Most players lose to the Moorwing the first time because they treat it like a grounded bug and try to swing at it on the ground. That approach fails because the enemy barely touches the floor. A better first read is to step back, look at the room, and decide which tool the encounter wants you to use.
Before engaging, check the following:
- Ceiling height. If the room is tall, the dive has more distance and more damage. Short ceilings are easier.
- Landing platforms. Floating platforms can break the dive into two passes and give you a safe spot to heal.
- Walls and spikes. Some rooms place the Moorwing near hazards that punish a panicked jump.
- Your current silk. Healing tools have cooldowns. Do not start a fight with empty resources unless you have to.
- Nearby passive bugs. Some rooms mix the Moorwing with slower enemies that will keep pressuring you if you ignore them.
This kind of pre-fight scan is itself a learned skill. Players who come from other Metroidvania titles tend to skip it because most action-platformer enemies do not require it. The For additional context, Hollow Knight series trains that habit, and the Moorwing is one of the early enemies that punishes the player for skipping the step.
Step-by-step strategy for the fight
The fight has a small number of valid solutions, and which one you pick depends on the tools you have already collected in the run. The method below is the most reliable one for a first or second attempt, and it works with the basic tool set the player is expected to have by the time they reach the area.
- Wait for the hanging state. Stand at mid-room, just outside the alert radius, and watch the wings.
- Move laterally on the wing-up. The dive direction is set at the end of the wing-up. A single horizontal dash is usually enough to clear the beak.
- Pogo upward on the dive. If you have a downward strike, hit the Moorwing as it passes underneath you. This is the safest damage window in the fight.
- Use the brake and turn for positioning. The wings flare at the end of the dive. Use that frame to plan your next jump rather than committing immediately to a chase.
- Strike during the retreat. When the creature drifts to a wall, land one or two hits on its body, not on the beak.
- Heal during the hang. After the retreat, the Moorwing returns to a wall and stays there for a beat. That beat is your heal window.
- Repeat until the creature breaks. The encounter is short. Most runs finish in three to five clean cycles.
The exact number of hits to kill a Moorwing depends on the player’s current tool strength and the area of the game. The pattern above is what stays constant: dodge the beak, punish the body, and never try to chase it mid-dive.
Common mistakes and how to recover from them
Every failed run against a Moorwing usually comes from one of three mistakes. Recognising them is faster than learning the encounter from scratch each time.
| Mistake | Why it happens | What it costs | How to fix it |
|---|---|---|---|
| Swinging at the beak | Players are used to hitting the front of enemies | Beak hitbox deals damage and pushes the player back | Aim one body length behind the beak and wait for the dive to finish |
| Chasing during the dive | The dive looks like an opening | The brake and turn often catches the player mid-air | Hold position, dodge, then counter during the retreat |
| Healing too late | Players want one more hit before healing | Loss of one full heal cycle and a chunk of silk | Use the hang state to heal every cycle, even when at full masks |
| Ignoring the ceiling | Players focus on the body | Spikes or contact damage during the upward jump | Read the room before the fight and pick a vertical line of retreat |
Players who internalise the table above tend to clear the encounter on the next attempt. The same lessons transfer to other flying enemies in the game, which is the real reason Team Cherry designed the Moorwing the way they did. It is a teaching enemy dressed up as a predator.
What the Moorwing teaches about Silksong’s combat design
Hollow Knight: Silksong is built around the same combat philosophy as its predecessor: every enemy is a small puzzle, and the player’s job is to read it. The Moorwing is a clean example of that philosophy because it is both an enemy and a tutorial in the same encounter. It teaches three skills that reappear throughout the game: how to read a short telegraph, how to use vertical space as a defensive tool, and how to take a heal window that is offered rather than created.
For developers, the interesting part of that is how economical it is. The Moorwing uses one attack, one retreat, and one passive state, and yet it produces a varied encounter because the room itself changes. The same state machine plays out differently in a tall shaft, a wide cavern, and a small corridor. That is a deliberate design choice, and it reflects the team’s habit of letting the level do the work that other games would encode in extra enemy behaviour.
Players who want to understand the rest of the game’s difficulty curve can use the Moorwing as a baseline. If the fight feels easy, the next similar enemy in the area is probably faster or more aggressive. If the fight feels hard, the player is probably missing one of the three skills above, and the fix is to work on that skill rather than to grind more health.
How the Moorwing compares to similar enemies in the series
For readers who have played the original Hollow Knight, the easiest way to understand the Moorwing is to compare it with the enemies that already do part of the same job. The table below maps the Moorwing against three familiar threats. It is a useful reference both for players and for anyone studying the design.
| Enemy | Movement | Main attack | Heal window | Skill it teaches |
|---|---|---|---|---|
| Moorwing (Silksong) | Winged, vertical | Long beak dive | Hanging on a wall | Aerial positioning and short-telegraph reading |
| Mantis (Hollow Knight) | Grounded, aggressive | Forward slash combo | After a successful parry | Reading combo length and timing a counter |
| Belfly (Hollow Knight) | Flying, erratic | Short charges and contact damage | When it rests on a wall | Patience and tracking |
| Hopper (Hollow Knight) | Jumping, predictable arc | Slam from above | Mid-bounce and at rest | Anticipating an arc and punishing the landing |
Comparing the four encounters side by side highlights what the Moorwing adds to the player’s toolkit. The Mantis is about reading long combinations on the ground. The Belfly is about waiting out an erratic flier. The Hopper is about predicting an arc. The Moorwing combines two of those lessons: the patience of a Belfly and the precise dodge timing of a Mantis, but applied to a creature that lives in the air. The combined lesson is what makes the enemy feel fresh even for players who have already beaten the original game.
Build and tool choices that make the fight easier
Silksong gives the player a flexible tool set, and a few of those tools are particularly good against the Moorwing. None of the suggestions below is required, but they all reduce the cost of a mistake and shorten the fight.
- Tools with horizontal mobility. A short dash that ignores momentum is enough to clear the beak on most dives.
- Downward strike upgrades. A faster or longer pogo gives the player more chances to land a clean hit during the dive.
- Healing tools on a short cooldown. A reliable heal lets the player use the hang state to recover masks without burning through scarce resources.
- Area-of-effect tools. These are useful when a second enemy shares the room with the Moorwing, but they are rarely worth the slot against a single Moorwing.
- Defensive tools with invulnerability frames. A well-timed defensive ability can replace a dash and is easier to use under pressure.
For developers, the takeaway is that the Moorwing rewards the player’s choice of tools rather than punishing it. An enemy that scales with the player’s build is one of the most efficient ways to make a standard encounter feel personalised, and it is another sign that the game is built around a tight inner loop: explore, find a new tool, return to a familiar enemy, and see the fight change.
How Silksong’s progression changes the way the encounter feels
Because Hollow Knight: Silksong is built around a non-linear map and a long progression arc, the same enemy can feel very different depending on when the player meets it. The Moorwing is a good example. Players who reach the area with the basic tool set will treat it as a serious threat. Players who return later with a more developed kit will use it as a quick stop on the way to harder content.
That dynamic is part of the reason the game has so few generic enemies. Each one has at least two natural difficulty settings, and the player’s route through the map decides which setting they get. The Moorwing is forgiving when the player is learning and almost trivial when the player has the right tools, and that range is exactly what a Metroidvania needs from a standard enemy.
What players often misunderstand about the encounter
Three misconceptions come up regularly in discussion of the Moorwing, and they are worth addressing because each one is a sign of a design pattern the player has not yet learned.
- “It hits twice.” The dive often looks like a single hit, but a second one can follow if the player is still in the air. The fix is to land before the brake, not after.
- “The beak is the weak point.” The beak is the attack. The body is the part that takes damage. Aiming at the wrong end of the enemy is the most common source of lost health.
- “It chases forever.” The retreat state has a fixed duration. Patients players will see the enemy leave on its own.
None of those points is hidden. They are all readable from the enemy itself once the player knows what to look for, which is the entire point of the design.
Where the Moorwing fits in the wider difficulty curve
Hollow Knight: Silksong is structured so that the player meets harder enemies as they explore further from the central hub, but the game’s difficulty is not strictly linear. Some areas are easier to reach than others, and a player can wander into a hard encounter early if they take a wrong turn. The Moorwing sits near the middle of the curve. It is more demanding than the very first enemies in the game, but it is far from the hardest threats in the late game.
That placement is deliberate. The encounter is meant to be hard enough that it pushes the player to learn a new skill, but not so hard that it locks the route. If the player cannot beat the Moorwing, the next step is usually to look at the map and find a different path, not to grind the same fight. That is a developer-friendly design because it keeps the difficulty curve responsive to the player’s choices rather than to a fixed script.
Designing a similar enemy: lessons from the Moorwing
For developers working on their own action-platformer, the Moorwing is a clean case study in how to build a fair but memorable standard enemy. Five lessons stand out:
- One defining attack. The dive is the entire fight. Everything else is setup or recovery.
- Strong silhouette. The beak, wings, and wall-hanging pose are readable from a distance and at speed.
- Short telegraph, clear recovery. The wing-up is short, but the retreat is generous. The two together create a fair fight.
- State machine over scripting. A handful of states covers the entire encounter, which keeps tuning cheap.
- Room as multiplier. The same enemy plays out differently in different rooms, so the level does the work of adding variety.
That list is a useful starting point for any small studio that wants to build a standard enemy in a similar genre. The key is to keep the design simple on paper and let the room and the player’s tool set do the rest of the work.
Frequently asked questions
Where does the Moorwing appear in Silksong?
The Moorwing is found in the vertical shafts and ruined halls of one of the mid-game areas, usually in rooms that combine a tall ceiling with limited floor space. Players tend to meet it for the first time while exploring a route that connects two larger zones, and the encounter is designed to be a checkpoint for that route rather than a one-off boss.
Is the Moorwing a required boss?
No. The Moorwing is a standard enemy, not a boss. There is no quest or progression gate that requires killing it, although the area it patrols usually has collectibles and shortcuts that the player will want to reach. Skipping it is possible in many rooms if the player has a movement tool that lets them bypass the patrol.
What is the best tool against the Moorwing?
Any tool that gives the player reliable horizontal mobility or a fast downward strike works well. The exact best tool depends on the player’s build, but the principle is the same: dodge the beak, hit the body, and use the wall-hang state to recover. Tools that reward patient play are usually better than tools that try to end the fight in one burst.
How many hits does the Moorwing take to defeat?
The exact number depends on the player’s current tool strength and the area of the game, but the encounter is designed to end in a small number of clean cycles. Three to five well-timed counterattacks during the retreat state are usually enough. The pattern is more important than the count, because the same number of poorly aimed hits will not finish the fight.
Why does the Moorwing feel harder than other flying enemies?
Most flying enemies in the series are either slow or erratic. The Moorwing is fast and direct, which is a less common combination. The dive has a clear direction and a short telegraph, but it covers a long distance and ends in a turn that catches players who chase it. That combination is what makes the fight feel different from a Belfly or a passive flier.
Can the Moorwing be parried?
It is built around dodge and counter, not parry. Players who try to parry the beak will usually trade health, because the dive hitbox is generous. The defensive tool that works best is a short dash or an invulnerability frame, both of which let the player skip the dive and punish the body.
Does the Moorwing respawn in benches?
Yes, like most standard enemies in the game, the Moorwing respawns when the player rests at a bench. That is part of the game’s resource loop: benches reset the world and give the player a chance to retry hard rooms, but they also reset enemies. The trade-off is intentional and is one of the reasons the game pushes the player to read encounters rather than grind them.
What should the player learn from the Moorwing for later fights?
The three lessons that carry over are short-telegraph reading, vertical positioning, and the habit of healing during a state that is offered rather than created. Those three skills show up again in the harder enemies, the late-game bosses, and the platforming challenges of the deep zones. Players who internalise them during the Moorwing fight will find the rest of the game’s difficulty curve easier to read.
How does the Moorwing compare to the flying enemies in the original Hollow Knight?
It is faster and more aggressive than the typical Belfly, and it lives in more vertical space than the Mantis enemies that dominate the Colosseum. Compared to the airborne threats in the late game of the original, it sits closer to a teaching enemy than to a punishing one. That placement is what makes it a useful early checkpoint in Silksong’s difficulty curve.
Is the Moorwing worth farming?
For standard progression, no. The encounter is short and the drops are not part of any required upgrade path. Players who want to optimise their route should treat the Moorwing as a quick stop rather than a farm. The only time it is worth repeating is when the player wants to practise the read-and-dodge skill that the encounter teaches, and a few clean runs are enough for that.
Practical next step
If the fight still feels unfair after several attempts, the issue is almost always one of three things: the player is hitting the beak instead of the body, the player is chasing the dive instead of dodging it, or the player is not using the hang state to heal. Fixing any one of those will usually turn the fight around. The same three checks are useful for the harder enemies that come later, and they are a reliable baseline for the rest of the run.
For a closer look at how Silksong expands on the original game’s combat and level design, the Hollow Knight series overview on Wikipedia gives a useful summary of the design lineage, and the differences and new features guide for Silksong lists the systems that the Moorwing sits inside.
Players who want to read more about the wider world of 3D animation in modern game development will find a useful breakdown of how creature silhouettes are designed, and the studio’s overview of full cycle game development shows how encounters like this one fit into a production plan from concept to ship.
Leave a Reply