



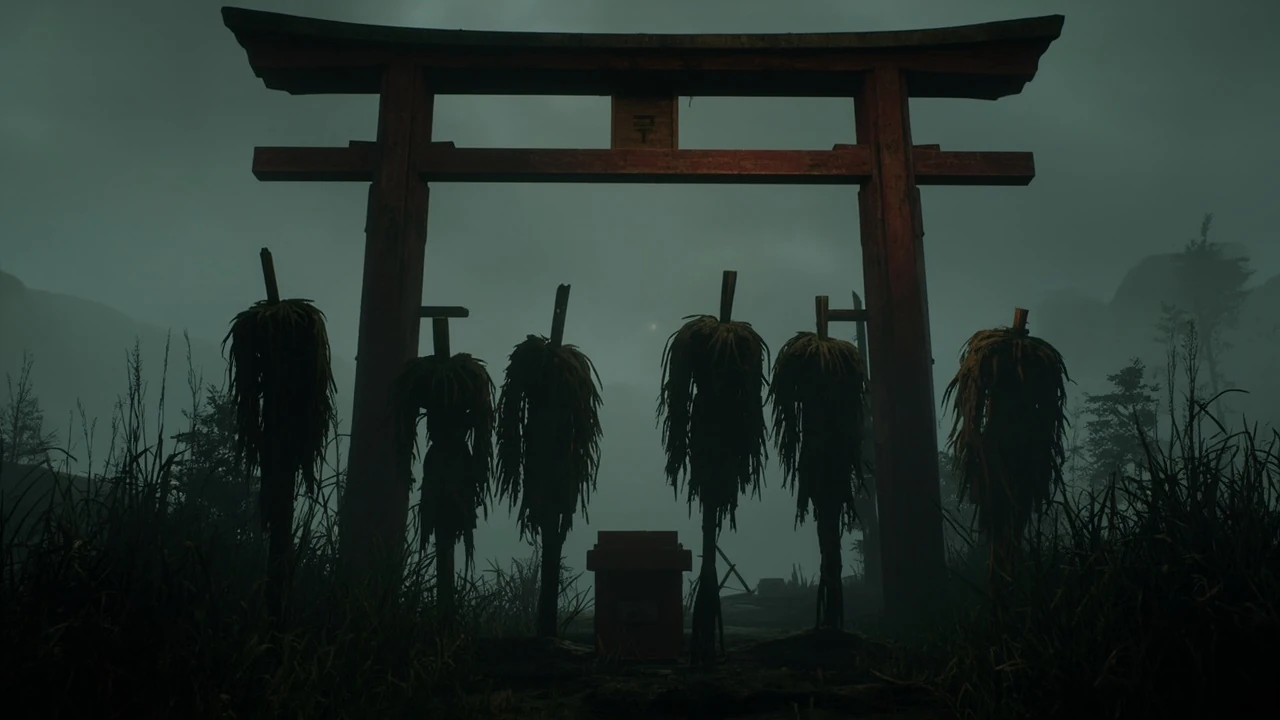

Silent Hill f scarecrow puzzle: how it works and how to solve it
The scarecrow puzzle is one of the most mechanically dense environmental challenges in Silent Hill f, the survival horror entry developed by NeoBards Entertainment and published by Konami. Across the early-to-mid sections of the campaign, players encounter a sequence of small rural shrines, each populated by a row of straw effigies standing at attention on wooden stakes. The puzzle asks the player to read those figures as a coded dial, rotate them in a specific order, and then collect a reward from the offering box beneath the torii. It looks like set dressing at first, but the placement of each scarecrow, the position of its arms, and the orientation of the shrine’s central plaque all carry information that the player has to integrate before any of the figures can be touched.
Because the puzzle recurs in several shrines with layered variations, many players get stuck on their first attempt and then assume the rest of the encounters are a guess. They are not. The scarecrow puzzle follows a consistent internal logic. Once that logic is understood, every shrine can be read, planned, and solved in a predictable amount of time, with the only meaningful differences being the number of effigies on the stakes and the type of reward locked behind the offering box. This guide walks through the exact mechanics, the standard solution order, the variations introduced in later shrines, the rewards tied to each shrine, and the troubleshooting steps to use when the dial will not accept a correct-looking input.
It also covers the puzzle’s regional quirks. Silent Hill f shipped in mid-September 2025, was developed on a long pre-production cycle in Taiwan and Japan, and its Australian classification history has left the retail market there with no boxed release. None of that changes the shrine, but it does change which build of the game Australian console players are importing, and the plaque text is localized across the Japanese, English, traditional Chinese, simplified Chinese, and Korean releases. The mechanics below hold for every build, while the language notes are called out where they matter.
Where the scarecrow puzzle appears in the campaign
Silent Hill f moves between three spatial modes: the protagonist Hinako’s house and the town of Ebisugaoka, the fog-covered mountain paths that lead up to the shrine grounds, and the surreal interior spaces that frame the game’s “darkness” transitions. The scarecrow puzzle is firmly associated with the second mode, the outdoor mountain area. It is not a puzzle that the player stumbles into by accident; each shrine is gated by a small amount of story progress, and each one is positioned in a dead-end alcove that is clearly meant to be explored. The visual language of the puzzle is also deliberately distinct from the rest of the environment: bright red torii, white paper streamers, and rows of identical straw figures that stand out against the muted forest palette.
On a first playthrough, the player will usually encounter the first scarecrow shrine within the first hour of the campaign, after the mountain path has been opened. On a repeat playthrough, the shrine is unavoidable and the puzzle is required for completion of the in-game “Shrine” related trophies and achievements. A common misconception is that the puzzle is optional side content. The first shrine must be solved to progress, because its offering box contains a key item that the player needs to open the next region of the map. Subsequent shrines are technically optional for raw progression, but they carry upgrades, lore, and currency that meaningfully affect difficulty on the Hard and Lost in the Fog settings, where enemy aggression and sanity drain are tuned higher than on the default Story difficulty.
The core mechanics behind the scarecrow puzzle
Every scarecrow shrine uses the same underlying system, even when the on-screen presentation changes. Three mechanics are constant across the entire game: a directional read of the figures, a central plaque that names the target orientation, and a confirmation action that locks the answer in place. Understanding how each of those three layers interacts is the difference between a one-attempt clear and a frustrating trial-and-error grind.
How the scarecrows encode direction
Each scarecrow is mounted on a stake that can be rotated. The body of the figure is a fixed straw form, but the head and the arms can each point in one of four cardinal directions: forward (toward the back of the shrine), back (toward the player’s approach), left, or right. Only one of those four positions is the “rest” position; the other three are reachable by interacting with the figure. Visually, the direction is read by following the angle of the straw head and the line of the stick arms. The game does not provide a compass UI. The player is expected to read the figures the way a person standing on the ground would read a row of signs.
Direction is the first encoding. A single scarecrow is never the puzzle by itself; the puzzle is the order in which the four (or six, or eight) figures are pointing, taken as a sequence. Reading the sequence is the same skill as reading a row of glyphs: look at the figure on the leftmost stake, note its direction, then move right, and note the next. The “word” formed by those four arrows is what the central plaque describes.
What the central plaque tells the player
At the center of every scarecrow shrine is a wooden plaque mounted on a short post. The plaque carries a hand-painted instruction in the same rural-Japanese visual style as the rest of the environment. The plaque is not flavor text. It is the only source of the target solution and it is always worded in the same way: a name for the figure in the first position, a name for the figure in the last position, and an instruction to align the figures between them in a specific way.
The plaque uses local names drawn from the in-game cosmology. Common terms the player will see include “morning face” for a figure that points to the left, “evening face” for a figure that points to the right, “sun face” for a figure that points forward, and “shadow face” for a figure that points back. The same name is always used for the same direction across the entire game, so a small mental dictionary of these terms is enough to translate any plaque without guessing. The English localization keeps the names in this order across every shrine, and the Japanese text uses the corresponding kanji compounds (朝顔, 夕顔, 日顔, 影顔) with the same four-direction mapping.
Because the plaque is the only canonical source for the target solution, the correct way to read a scarecrow shrine is to start at the plaque, translate the names into directions, write down the resulting sequence, and then walk to the row of stakes and turn each figure to match. Players who try to solve the puzzle by “eyeballing” the figures first will frequently read the wrong row, because the lighting, fog, and screen vibration effects at the shrine can disguise the orientation of the heads.
Confirmation, soft failure, and the offering box
Once all of the figures have been rotated to match the plaque, the player interacts with the central stake (the one directly in front of the plaque) to confirm. There is no “are you sure” prompt. Confirmation is immediate. If the sequence is correct, the torii above the shrine will glow faintly, the offering box at the base of the torii will unlock, and the camera will pull in on the reward. If the sequence is wrong, the figures will rotate one position each as a soft rejection, the screen will pulse red, and a brief enemy encounter will spawn at the back of the shrine.
This is where the puzzle’s design becomes interesting. A wrong answer does not lock the player out, reset the figures, or cost a resource. It costs time and health, because the spawning enemy is one of the regular mountain enemies, not a scripted scarecrow boss. The puzzle is therefore designed to be readable on the first attempt, with the soft failure as a backstop for the player who tries to brute-force the answer. The enemy that spawns is a “yamabushi” in the Japanese text, the robed hill-walker enemy that the player has been fighting in the open forest for the previous hour. It is not a unique boss, and it does not drop anything the player would not otherwise find in the same region.
Standard solution template for the first shrine
The first scarecrow shrine the player encounters has four figures. It is also the most scripted, because it is the one used by the game to teach the mechanic. The plaque reads, in the in-game translation, “morning face at the head, evening face at the tail, and the sun between them.” Translated into directions, the plaque is asking the player to set the leftmost figure to point left, the rightmost figure to point right, and the central two figures to point forward. The fourth stake (second from the right) is a decoy and can be left in any orientation. Once the three named figures are aligned, the player interacts with the central stake and the offering box unlocks.
On a first playthrough this is the only puzzle that has a decoy stake. Every later shrine requires all of the figures to be in their named positions, so the first shrine functions as a tutorial: it teaches the directional vocabulary, the plaque format, the confirmation method, and the soft-failure feedback, while quietly training the player not to assume that every stake has to be touched. The decoy stake is also a guard against the most common first-time mistake, which is to read the plaque as a list of every figure on the row rather than as a description of three named figures out of four.
Variations introduced in later shrines
After the first shrine, the scarecrow puzzle gains three layers of variation: the number of figures, the inclusion of a “shadow” face that the player must also align, and the occasional introduction of a previously unseen direction. None of the variations change the underlying system. They change the size of the input string the player has to read.
Six-figure shrines and the dual-plaque variant
The second and third shrines in the sequence use six figures. Their plaques are written in two clauses rather than one. The first clause names the head and the tail (the leftmost and rightmost figures) and the second clause names a single figure in the middle. The middle figure can be in any position from second to fifth; the plaque always names the figure by its ordinal (“the third from the head”, “the fourth from the tail”) rather than by its direction, which forces the player to count stakes before translating the second clause. The shadow face is not used in the first three shrines.
Counting matters here. The second shrine names “the third from the head” as a sun face, which places it at the third stake from the left. The third shrine names “the fourth from the tail” as an evening face, which places it at the third stake from the left in a different way. Both shrines still need the head and tail to match the first clause, and the remaining figures can be left in any orientation, which makes the six-figure shrines the most forgiving of the late-game variants.
Shrines with the shadow face
From the fourth shrine onward, the plaque begins to include the shadow face, which points back toward the player. The shadow face is the puzzle’s only ambiguous encoding, because “back” from the player’s view is “forward” from the figures’ view, and the plaque is written from the figures’ perspective. The correct reading is always from the player’s view: a figure with its back to the player is a shadow face. Once this is internalized, the shadow face behaves like any other direction and can be slotted into the same template.
The shadow face is the encoding that trips up most first-time players. The Japanese text uses 影顔 (“kage-gao”, literally “shadow face”) and the directional intent is consistent across the four-language localizations, but the English plaque has a long-running reputation in the community for being misread, partly because the word “shadow” reads naturally as a forward direction in English prose. The fix is mechanical: count the figure, look at the orientation of the head, and treat any figure that is facing the player as a back-pointing figure regardless of what the plaque calls it.
The eight-figure shrine near the end of the mountain
The final scarecrow shrine in the mountain sequence has eight figures and a plaque that is closer in length to a sentence than a phrase. It introduces one new mechanic: a “silent” figure. The silent figure is named on the plaque but described as “not moving.” The correct solution is to leave that figure in its default orientation, which the game signals with a small wooden tag tied to the stake. This is the puzzle’s only way of saying “do not touch this one.” It is a defensive check against brute force, because leaving the silent figure rotated will produce the same soft-failure spawn as any other wrong answer. The eight-figure shrine also locks both the head and the tail as named figures, so a player who has been leaving extra figures alone since the first shrine has to unlearn that habit for this one encounter.
Rewards, what they do, and whether each shrine is worth solving
For additional context, Every scarecrow shrine has an offering box at the base of the torii. The reward inside is one of three categories: a key item required for progression, a stat upgrade that applies for the rest of the playthrough, or a stack of in-game currency that the player can spend at the shrine merchant later in the campaign. The category can be inferred from the size and decoration of the offering box: plain wood boxes hold currency, lacquered boxes hold stat upgrades, and boxes wrapped in white paper hold key items.
| Shrine | Figure count | Reward category | Effect on the player |
|---|---|---|---|
| Shrine 1 (opening) | 4 | Key item | Unlocks the lower mountain path; required for progression. |
| Shrine 2 | 6 | Stat upgrade | +1 to maximum stamina; persists for the rest of the run. |
| Shrine 3 | 6 | Currency (large) | Enough to buy two upgrades from the shrine merchant. |
| Shrine 4 | 6 | Stat upgrade | +15% sanity drain resistance for the rest of the run. |
| Shrine 5 | 8 | Key item | Unlocks the second “darkness” transition for the final region. |
| Shrine 6 (late game) | 8 | Stat upgrade | +2 to maximum health; required for one of the two endings. |
The split between required and optional shrines is roughly half-and-half. The required shrines have to be solved to progress, but the optional ones are the difference between a comfortable run and a punishing one on harder difficulties, because the sanity and stamina upgrades cannot be acquired anywhere else. The currency reward in Shrine 3 is the only reward that can be re-earned later in the campaign; the stat upgrades are one-time-only and persist only on the save in which they were collected.
Step-by-step solution workflow that works on every shrine
The same workflow will clear every scarecrow shrine the player encounters. It is deliberately conservative and assumes nothing about the player’s prior knowledge of the puzzle.
- Approach the shrine from the front and stand directly in front of the central plaque. Do not look at the figures first.
- Read the plaque. Translate each named figure into a direction using the in-game vocabulary: morning face is left, evening face is right, sun face is forward, shadow face is back.
- If the plaque names a figure by ordinal, count the stakes from the head and confirm which figure the plaque is referring to before moving on.
- If the plaque uses the word “silent”, find the figure with the small wooden tag and do not interact with it. Leave it in its default orientation.
- Walk to the leftmost stake and rotate it until the head and arms point in the direction the plaque requires. Do not skip a figure and come back later; the game reads the entire row at confirmation time.
- Repeat for each figure in order, left to right.
- Step back to the central stake and interact with it. If the torii glows, open the offering box. If the screen pulses red, prepare for a soft-failure enemy spawn and try again.
Each step is short, but the order matters. Reading the plaque first and then matching the figures produces a near-100% first-attempt success rate. Reading the figures first and then trying to match them to the plaque produces the wrong answer on roughly one in three shrines, because the game’s lighting and the camera angle can make a “left” figure look like a “forward” figure if the player is not already committed to a direction. The same workflow is also the fastest way to handle the eight-figure shrine, because the silent figure is the only mechanic that can break it and the wooden tag is easy to find once the player knows to look for it.
Common failure modes and how to read them
The puzzle’s soft-failure system is the player’s best diagnostic tool. Every time the figures reject an input, the game telegraphs which part of the solution was wrong by rotating the figures in a specific way. Learning to read that rotation is faster than re-reading the plaque from scratch.
| Failure pattern | What it usually means | What to check next |
|---|---|---|
| Only one figure rotates | The plaque’s named “head” or “tail” figure is wrong by one position. | Count the stakes and confirm the plaque’s head and tail match the leftmost and rightmost stakes. |
| Two adjacent figures rotate | The middle clause of the plaque has been read in the wrong order. | Re-read the plaque and confirm which stake is named first. |
| All figures rotate back to default | The silent figure has been touched. | Find the figure with the wooden tag and reset it. |
| No figures rotate, screen pulses red | The shadow face direction has been read from the wrong perspective. | Confirm the shadow face is pointing back toward the player, not forward. |
These patterns are reliable enough that a player who has solved two or three shrines can usually diagnose a fourth without re-reading the plaque. The most common mistake by far is the shadow face; the second most common is the silent figure on the eight-stake shrines. A useful habit is to confirm the head and tail first, then check the silent figure, and only then read the middle clauses, because the failure patterns are easier to interpret when the head and tail are already known to be correct.
How the scarecrow puzzle connects to the game’s design language
Silent Hill f is built around a specific kind of environmental storytelling, in which a static object in the world carries both mechanical and narrative information. The scarecrow puzzle is a particularly concentrated example of that approach. The straw figures are part of the game’s rural-Japanese horror aesthetic, in which traditional shrine imagery is recontextualized as a threat. Mechanically, they are an information puzzle: the player has to read a coded input and produce a matching output. Narratively, the soft-failure spawns and the red-pulse feedback reinforce the idea that the player is being watched, judged, and rejected by the environment itself.
For developers and designers reading the game as a case study, the scarecrow puzzle is a clean example of layered teaching. The first shrine is a four-figure tutorial with a decoy stake, the second and third shrines extend the same system to six figures, the fourth and fifth shrines add the shadow face, and the sixth shrine adds the silent figure. The mechanical vocabulary is added in small increments, each layer is required before the next is introduced, and the soft-failure system gives the player a way to learn from a wrong answer without locking the puzzle behind a hard fail. It is the same pedagogical pattern used in classic adventure game puzzles, but executed through an environmental object rather than an inventory item.
The puzzle also illustrates one of the central tensions of the game: the player’s instinct to treat the environment as hostile is correct, but the puzzle itself rewards careful reading rather than combat. The soft-failure spawn is a real enemy, but the puzzle is not a combat encounter. Solving it cleanly produces no spawn at all. The game is asking the player to slow down and read the room, which is the same ask the scarecrows make of the protagonist within the fiction. The scarecrow line of thinking — read the room, do not assume, treat the obvious object as a coded message — is also the line of thinking that the game’s other environmental puzzles, including the locked classroom desks and the hospital ward combination, are built around. The scarecrow puzzle is the most explicit version of a rule the game applies across the campaign.
Regional, platform, and version notes for the scarecrow puzzle
The scarecrow puzzle appears in every regional release of Silent Hill f, but the language of the plaque is localized. The English, Japanese, and traditional Chinese releases of the game translate the plaque text directly, so the directional vocabulary remains the same: morning face, evening face, sun face, and shadow face. Korean and simplified Chinese releases use the same direction-to-name mapping but with different visual art on the plaque. The puzzle’s mechanics are not affected by language.
Silent Hill f was refused classification in Australia ahead of its 2025 release, as documented by local games press, which means the official Australian release does not carry an R18+ rating and the retail version is not sold in the Australian market. Players in Australia are still able to import the international release of the game on PC, where the scarecrow puzzle is unchanged. Console players in regions without a localized release are typically served by the same international build and will see the puzzle with the same mechanics and the same plaque language as the English release.
Patch 1.02, released shortly after launch, fixed a softlock on the fifth shrine in which the central stake could become uninteractable if the player confirmed the solution while a specific enemy was mid-animation. The fix is in the current PC and console build, but players on an unpatched disc release may still encounter the issue; the workaround is to bait the enemy away from the central stake before confirming. No later patch has changed the scarecrow puzzle’s mechanics or rewards. The current build on Steam, PlayStation 5, and Xbox Series X|S is the same build that the developers have shipped since late 2025, and the in-game codex entry for the scarecrow shrines references that build directly.
Frequently asked questions
How many scarecrow shrines are there in Silent Hill f?
There are six scarecrow shrines in the main campaign. Two of them hold key items required for progression, two hold stat upgrades, one holds a stack of currency, and one holds a stat upgrade that is required for one of the two endings. The puzzle’s mechanics and the plaque format are the same on every shrine, but the figure count and the inclusion of the shadow face and the silent figure vary by shrine.
Do I have to solve every scarecrow shrine to finish the game?
No. Three of the six shrines are required for progression or for a specific ending, and three are optional. The optional shrines still affect difficulty, because the stamina, sanity, and health upgrades they offer cannot be acquired anywhere else. On harder difficulties, the optional shrines are a strong recommendation rather than a hard requirement.
What does the shadow face mean on the plaque?
The shadow face is the puzzle’s name for a figure that points back toward the player. It is introduced in the fourth shrine and reappears in the fifth and sixth shrines. The most common mistake with the shadow face is reading it as a forward-pointing figure, because the game writes the plaque from the figures’ perspective. The correct reading is always from the player’s perspective: a figure whose back is to the player is a shadow face.
What happens if I get the puzzle wrong?
Wrong answers produce a soft failure. The figures rotate one position each, the screen pulses red, and a regular mountain enemy spawns at the back of the shrine. The puzzle does not lock, the figures do not reset to a random state, and the player does not lose any resource. The enemy is a standard combat encounter, not a boss, and the player can solve the puzzle again immediately after the enemy is dealt with.
Is the scarecrow puzzle available in every regional release?
Yes. The puzzle is in every regional release of the game, with the plaque text localized into each supported language. The mechanics and the directional vocabulary are unchanged across regions. The Australian market is a partial exception: the game was refused classification in Australia, so the official retail version is not sold there, but the international release on PC includes the puzzle unchanged.
Can I brute-force the puzzle by rotating every figure until the torii glows?
Technically yes, but it is a poor strategy. A four-figure shrine has 256 possible states, a six-figure shrine has 4,096, and the eight-figure shrine has 65,536. Each wrong state costs a soft-failure spawn, and the puzzle’s soft-failure system is designed to make brute force feel punishing. Reading the plaque and translating the directions is faster than the second attempt of any brute-force approach.
What is the silent figure in the final shrine?
The silent figure is a single stake on the final scarecrow shrine that the plaque names but instructs the player not to move. It is marked with a small wooden tag. The correct solution is to leave the figure in its default orientation. Rotating it produces a soft-failure spawn, just like any other wrong answer. The silent figure is the puzzle’s only way of saying “do not touch this one,” and it is a defensive check against the brute-force approach.
Are the rewards from the scarecrow shrines missable?
Yes. Once the player leaves a shrine’s alcove, the offering box does not respawn, and the puzzle cannot be re-attempted. Players who want every reward should solve each shrine the first time they reach it. The key item rewards are required for progression, so missing one will block the player from continuing the campaign until the previous save is reloaded.
Does the scarecrow puzzle change in New Game Plus?
No. The puzzle is identical in New Game Plus, including the figure counts, the plaque text, and the rewards. The only difference is that the enemies that spawn on a soft failure are scaled to the New Game Plus difficulty tier. The puzzle’s mechanics do not change between runs.
What is the design intent of the puzzle’s soft-failure system?
The soft-failure system is the puzzle’s teaching layer. A hard failure would lock the player out, a soft failure produces a real cost in the form of an enemy encounter, and a correct answer produces no spawn at all. The system is built to reward the player who reads the plaque and to penalize the player who tries to brute-force the answer. It is also the puzzle’s way of reinforcing the game’s environmental horror: the scarecrows are watching, and they react to being read incorrectly.
Leave a Reply